catkin profileが便利
catkin tools (catkinコマンド)を用いてソースコードをビルドする時に、ビルドオプションを変更したいことがあります。 たとえば、RelaseビルドとDebugビルドを切り替えたいときです。
このようなビルドオプションの切り替えには、catkin profileの機能が便利です。
catkin profileは異なるビルドオプションなどcatkin configの設定を保存することができます。
下のコマンドでは、RelWithDebInfoとDebugというprofileに、それぞれのcmakeのオプションを設定しています。
catkin config --profile RelWithDebInfo --cmake-args -DCMAKE_CXX_COMPILER_LAUNCHER=ccache -DCMAKE_CC_COMPILER_LAUNCHER=ccache -DCMAKE_EXPORT_COMPILE_COMMANDS=ON -DCMAKE_BUILD_TYPE=RelWithDebInfo
catkin config --profile Debug --cmake-args -DCMAKE_CXX_COMPILER_LAUNCHER=ccache -DCMAKE_CC_COMPILER_LAUNCHER=ccache -DCMAKE_EXPORT_COMPILE_COMMANDS=ON -DCMAKE_BUILD_TYPE=Debug
現在のprofileを確認するためには、catkin profile listというコマンドを利用します。
$ catkin profile list
[profile] Available profiles:
- default
- Debug
- RelWithDebInfo (active)
catkin configの先頭にも有効なprofileが表示されます。
$ catkin config
--------------------------------------------------------------------------------------------------------------------
Profile:                     RelWithDebInfo
Extending:          [cached] /opt/ros/melodic
Workspace:                   /home/garaemon/catkin_ws
(略)
Additional CMake Args:       -DCMAKE_CXX_COMPILER_LAUNCHER=ccache -DCMAKE_CC_COMPILER_LAUNCHER=ccache -DCMAKE_EXPORT_COMPILE_COMMANDS=ON -DCMAKE_BUILD_TYPE=RelWithDebInfo
(略)
profileを切り替えるには、catkin profile setというコマンドを利用します。
$ catkin profile set RelWithDebInfo
[profile] Activated catkin metadata profile: RelWithDebInfo
[profile] Available profiles:
- default
- Debug
- RelWithDebInfo (active)
find-name-diredから.gitディレクトリを除く
catkin toolsでcompile_commands.jsonを生成する
ROSのパッケージをビルドするときにcatkin tools (catkin_makeではなくてcatkinコマンド)を利用してcompile_commands.jsonを生成するために、シェル関数を~/.bashrcとか~/.zshrcに定義しておくと便利。
開発時は定期的に気が向いたら実行する。
compile_commands.jsonはclang-tidy走らせたり, cqueryのようなソースコード編集時にエディタで補完を助けてくれるlspサーバが利用するファイル。
コンパイル時に実行されるコマンドなどが入っている.
このシェル関数でやっていることは以下の3点
- catkinのcmakeの引数に
-DCMAKE_EXPORT_COMPILE_COMMANDS=ONが入っていなかったら追加する catkin buildの実行- catkin workspaceのbuildディレクトリ以下にできた
compile_commands.jsonをソースコード側のパッケージのトップディレクトリにシンボリックリンクを貼る.
function catkin-compile-commands-json() {
    local catkin_ws=$(echo $CMAKE_PREFIX_PATH | cut -d: -f1)/..
    # Verify catkin cmake args contains -DCMAKE_EXPORT_COMPILE_COMMANDS=ON.
    # If the arguments does not include the option, add to cmake args.
    (cd "${catkin_ws}" && catkin config | grep -- -DCMAKE_EXPORT_COMPILE_COMMANDS=ON >/dev/null)
    local catkin_config_contains_compile_commands=$?
    if [ $catkin_config_contains_compile_commands -ne 0 ]; then
        echo catkin config does not include -DCMAKE_EXPORT_COMPILE_COMMANDS=ON
        (
            cd "${catkin_ws}" &&
                catkin config -a --cmake-args -DCMAKE_EXPORT_COMPILE_COMMANDS=ON
        )
    fi
    # Run catkin build in order to run cmake and generate compile_commands.json
    (cd "${catkin_ws}" && catkin build)
    # Find compile_commands.json in build directory and create symlink to the top of the package
    # directories.
    local package_directories=$(find "${catkin_ws}/src" -name package.xml | xargs -n 1 dirname)
    for package_dir in $(echo $package_directories); do
        local package=$(echo $package_dir | xargs -n 1 basename)
        (
            cd "${catkin_ws}"
            if [ -e ${catkin_ws}/build/$package/compile_commands.json ]; then
                ln -sf ${catkin_ws}/build/$package/compile_commands.json \
                    $(rospack find $package)/compile_commands.json
            fi
        )
    done
}
compile_commands.jsonのシンボリックリンクがパッケージのトップディレクトリにできてしまうので, .gitignoreなどでgitの対象から外してあげるのとセットで運用している。
display-fill-column-indicator-modeを試す
display-fill-column-indicator-modeの使い方
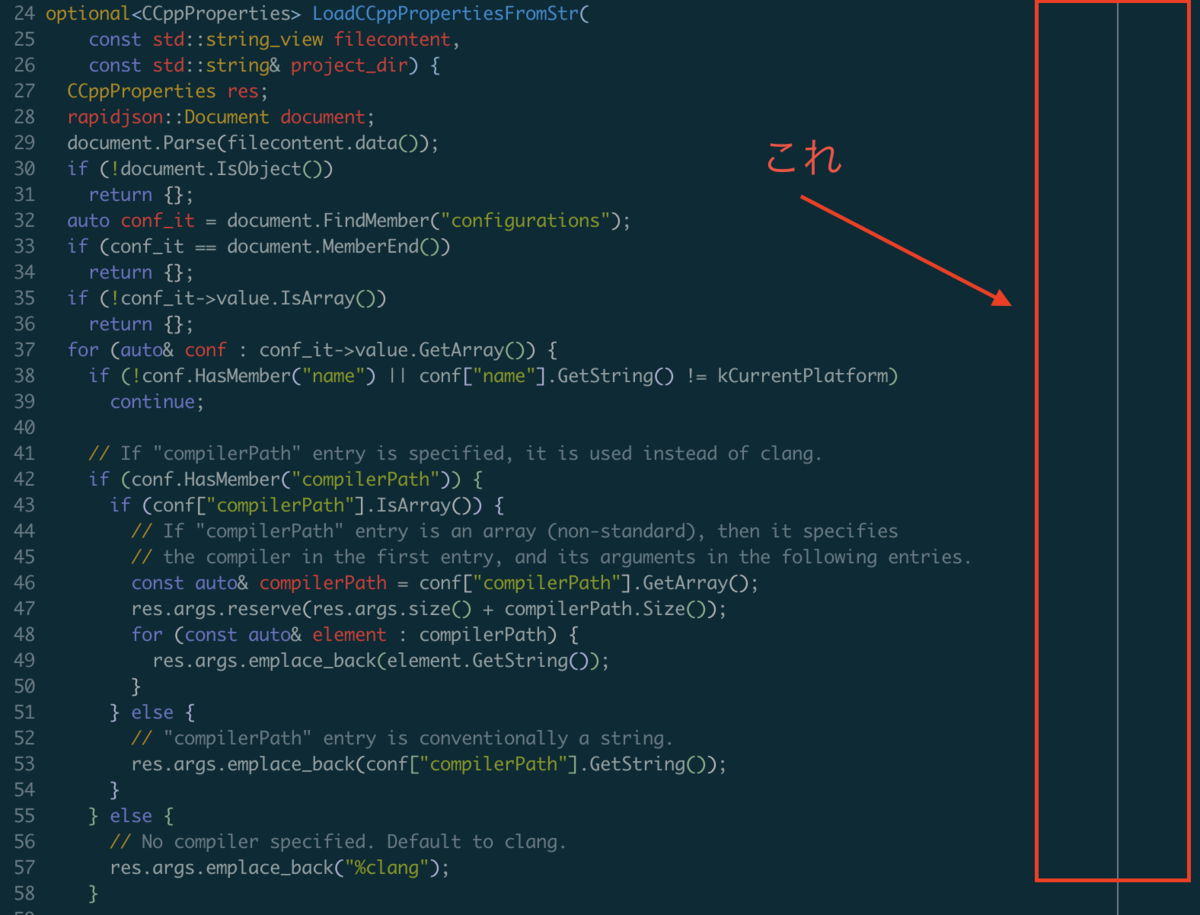
display-fill-column-indicator-modeという, モードがemacs27から実装されている. これは, 指定した行に目印を表示して、横に長過ぎるコード・文章を書かないようにするminor modeだ.

設定方法は以下のような感じ.
(setq-default display-fill-column-indicator-column 100)
(global-display-fill-column-indicator-mode)
これはもともと, fci-modeとして提供されていたものが, native実装になったものらしい.
company-lspとの併用
そもそも, fci-modeでは, emacs -nw環境下でcompany-lspを表示するとUIが崩れてしまうという問題があった(個人の環境依存かもしれない)

一方, display-fill-column-indicator-modeにすると表示崩れがなくなった!

(set-language-environment "Japanese") との相性
また、(set-language-environment "Japanese")をdisplay-fill-column-indicator-modeと同時につかうと、以下のように表示が崩れる.

vscodeのtabの挙動をemacsっぽくする

visual studio codeのtabの挙動をemacsのようにしたい.
そのために, 以下の2つのextensionを利用する. * vscode-emacs-indent * customize-indentation-rules
emacsにおけるtabを押したときの挙動は以下のようなものだ.
- tabを押すと, その行がインデントされる. インデント幅を単純に増やすのではなく, 一つ前の行の文法とインデントによって決定される. したがって、tabを連打してもインデントは増えたりしない.
- カーソル位置は相対的に保存される. ただし, 文字よりも左側にカーソルがある場合、最も左の文字まで移動する.
一方で, vscodeの標準のtabの挙動は押すたびにインデントが増えていく挙動になっている.
このような挙動をemacsのように変更するextensionがvscode-emacs-indentだ. このextensionを入れることでjavascript, typescriptなどは所望の挙動をするようになる。
一方で, C++やPythonではvscode-emacs-indentを使ったとしてもtabを押してもインデントされない. これらの言語では, indentationRulesが設定されていないからである.
- goのindentationRulesの設定(language-configuration.json)
- typescriptのindentationRulesの設定 (.tsファイルから設定している)
- c++のlanguage-configuration.json. indentationRulesの設定がない.
そこで, customize-indetation-rulesという各言語のindentationRulesを上書き可能なextensionを作成した。
customize-indentation-rulesを利用すると, settings.jsonに設定を書けばindentationRulesが定義されていない言語に対して追加で定義することができる。 例えば、C++だと以下のような設定を書くと、インデントされるようになる. (元ネタは以前vscodeから削除されたC++のインデントルール)
以上のように, vscode-emacs-indentとcustomize-indentation-rulesを組み合わせると, vscodeのtabの挙動がemacsでの挙動を近づけることができる.
選択しているbufferに応じてneotreeのディレクトリを移動させる
emacsでbufferを選択するたびにneotreeのディレクトリがそれに応じて変わると便利なのではないかと思い, 設定してみた.
bufferの選択に応じて呼び出されるhookは存在しないらしいので, switch-buffer-functionsを利用する
(use-package switch-buffer-functions :ensure t)
switch-buffer-functionsにhookを追加.
(add-hook 'switch-buffer-functions
          (lambda (prev current)
            (let ((neotree-buffer (neo-global--get-buffer)))
              (if (and
                   ;; Ignore if new buffer is neotree
                   (not (eq current neotree-buffer))
                   ;; Ignore if the buffer is not assosiated with a file
                   buffer-file-name
                   ;; Ignore if neotree is not active
                   (neo-global--window-exists-p))
                  (progn
                    (neo-buffer--change-root default-directory)
                    (switch-to-buffer current)
                    )
                )
              )
            ))
macでimagemagickとcocoaが有効になったemacsを使う
結論から言うと, emacs-plusを使うと良い
macでemacsをcocoa上で動かしたい時, homebrewではbrew cask install emacsのようにインストールする.
しかしこれだとimagemagickが有効になっていない.
imagemagickが有効化は以下のコマンドで調べられる.
(image-type-available-p 'imagemagick)
markdown-modeの
markdown-max-image-sizeを使いたかったのだが, これが
imagemagick必須だった
ので,
brew cask経由で入れたemacsでは有効にならなかった.
mac上で簡単にimagemagickとcocoaが有効なemacsを使うには, emacs-plusを使うと良い
brew tap d12frosted/emacs-plus
brew install emacs-plus --with-imagemagick@6 --without-spacemacs-icon
--without-spacemacs-iconは, とくにspacemacsを使っているわけでないのでつけてみた.